[OpenShift 오픈시프트] RHOCP 4.14.15 Installation - 2. Bastion 노드 구성
RHOCP 4.14.15 설치 (오픈시프트 설치) - Bastion 노드
Test Environment
Red Hat Enterprise Linux 9.2 (Plow)
RHEL 9.2를 설치하고 bastion.openshift.ig.local(hostname), 172.16.0.170(ip)로 구성했다.
구성도는 1. Overview 포스팅을 참고하면 된다.
1. 기본 OS 설정
영구 마운트 등록
blkid 명령을 통해 현재 사용 중인 iso 파일의 라벨명을 확인할 수 있다.
1
/dev/sr0: UUID="2024-04-12-03-32-56-00" LABEL="RHEL-9-4-0-BaseOS-x86_64" TYPE="iso9660" PTUUID="8b7567d5" PTTYPE="dos"
시스템 재부팅 시에도 항상 반영될 수 있도록, fstab 파일에 라벨명으로 /media 위치에 영구 마운트 설정을 해준다.
vi /etc/fstab
1
LABEL=RHEL-9-4-0-BaseOS-x86_64 /media iso9660   defaults        0 0
mount -a 명령으로 /etc/fstab 파일에 정의된 모든 파일 시스템을 마운트한다.
1
2
3
mount: /media: WARNING: source write-protected, mounted read-only.
mount: (hint) your fstab has been modified, but systemd still uses
       the old version; use 'systemctl daemon-reload' to reload.
systemd 데몬이 현재 사용 중인 설정 파일들을 다시 업데이트하도록 명령어를 입력한다.
systemctl daemon-reload
lsblk 명령어로 /media 위치에 마운트 된 것을 확인할 수 있다.
1
2
3
4
5
6
7
8
9
NAME                  MAJ:MIN RM   SIZE RO TYPE MOUNTPOINTS
sda                     8:0    0   500G  0 disk
├─sda1                  8:1    0   600M  0 part /boot/efi
├─sda2                  8:2    0     1G  0 part /boot
└─sda3                  8:3    0 497.9G  0 part
  ├─rhel_bastion-root 253:0    0   485G  0 lvm  /
  ├─rhel_bastion-swap 253:1    0   7.9G  0 lvm  [SWAP]
  └─rhel_bastion-home 253:2    0     5G  0 lvm  /home
sr0                    11:0    1  10.3G  0 rom  /media
방화벽, SELinux 비활성화
systemctl disable --now firewalld
1
2
Removed "/etc/systemd/system/multi-user.target.wants/firewalld.service".
Removed "/etc/systemd/system/dbus-org.fedoraproject.FirewallD1.service".
setenforce 0sed -i 's/SELINUX=enforcing/SELINUX=disabled/g' /etc/selinux/config
/etc/hosts 내용 추가
ip 정보와 호스트이름을 추가해준다.
vi /etc/hosts
1
172.16.0.170 bastion bastion.openshift.ig.local
시스템 시간 설정
심볼릭 링크를 이용해 시스템 시간을 서울 시간대로 변경한다.
1
ln -sf /usr/share/zoneinfo/Asia/Seoul /etc/localtime
ls -rtl /etc/localtime
1
lrwxrwxrwx. 1 root root 30 Jul 15 16:27 /etc/localtime -> /usr/share/zoneinfo/Asia/Seoul
Local Repository 설정
vi /etc/yum.repos.d/local.repo 로컬 레파지토리 설정을 위해 파일을 생성한다.
1
2
3
4
5
6
7
8
9
10
11
[RHEL9-BaseOS]
name=BaseOS
baseurl=file:///media/BaseOS
enabled=1
gpgcheck=0

[RHEL9-AppStream]
name=AppStream
baseurl=file:///media/AppStream
enabled=1
gpgcheck=0
yum cache를 초기화하고, repolist가 잘 반영되었는지 확인한다.
yum clean all; yum repolist
1
2
3
4
5
6
7
8
Updating Subscription Management repositories.
Unable to read consumer identity

This system is not registered with an entitlement server. You can use "rhc" or "subscription-manager" to register.

repo id                                                                           repo name
RHEL9-AppStream                                                                   AppStream
RHEL9-BaseOS                                                                      BaseOS
Apache Httpd 서버 구성
아파치 httpd 서버를 설치한다.
yum -y install httpd
80포트를 8080포트로 Listen 할 수 있도록 설정을 변경해준다.
sed -i 's/Listen 80/Listen 8080/g' /etc/httpd/conf/httpd.conf
아파치 웹 서버를 실행하고 상태를 확인한다.
systemctl enable httpd --now
1
Created symlink /etc/systemd/system/multi-user.target.wants/httpd.service → /usr/lib/systemd/system/httpd.service.
systemctl status httpd
1
2
3
4
5
6
7
8
9
10
11
12
13
14
15
16
17
18
19
20
● httpd.service - The Apache HTTP Server
     Loaded: loaded (/usr/lib/systemd/system/httpd.service; enabled; preset: disabled)
     Active: active (running) since Mon 2024-07-15 16:35:53 KST; 19h ago
       Docs: man:httpd.service(8)
   Main PID: 36956 (httpd)
     Status: "Total requests: 1; Idle/Busy workers 100/0;Requests/sec: 1.42e-05; Bytes served/sec:   0 B/sec"
      Tasks: 177 (limit: 100314)
     Memory: 40.5M
        CPU: 47.799s
     CGroup: /system.slice/httpd.service
             ├─36956 /usr/sbin/httpd -DFOREGROUND
             ├─36957 /usr/sbin/httpd -DFOREGROUND
             ├─36958 /usr/sbin/httpd -DFOREGROUND
             ├─36959 /usr/sbin/httpd -DFOREGROUND
             └─36960 /usr/sbin/httpd -DFOREGROUND

Jul 15 16:35:52 bastion.openshift.ig.local systemd[1]: Starting The Apache HTTP Server...
Jul 15 16:35:52 bastion.openshift.ig.local httpd[36956]: AH00558: httpd: Could not reliably determine the server's fully qualified domain name, using bastion>
Jul 15 16:35:53 bastion.openshift.ig.local httpd[36956]: Server configured, listening on: port 8080
Jul 15 16:35:53 bastion.openshift.ig.local systemd[1]: Started The Apache HTTP Server.
2. Mirror Registry 설정
mirror-registry 사용
Mirror Registry는 Disconnected 설치 시 필수 컨테이너 이미지를 미러링하기 위한 대상으로 사용할 수 있는 컨테이너 레지스트리이다.
OpenShift Container Platform 이미지의 미러를 저장하기 위해 포트 443에서 실행되는 로컬 호스트 레지스트리를 생성할 수 있다.
Bastion 노드에 미러 레지스트리 컨테이너를 띄우는 이유는 Bootstrap/Master 노드 구성에 필요한 필수 리소스들을 생성하기 위해서이다.
먼저 Pull Secret을 다운로드 해야한다.
아래 링크에서 다운로드 할 수 있으며, 컨테이너 이미지를 가져오기 위해 사용되는 인증 정보라고 생각하면 된다. (RedHat 구독 계정 필요)
https://console.redhat.com/openshift/install/pull-secret
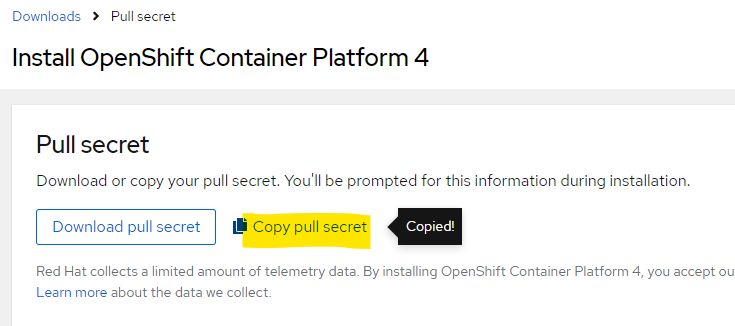
Copy pull secret을 눌러 복사하면 한 줄로 된 긴 내용이 복사된다.
대략적인 형식은 다음과 같으며, 복사한 내용을 /tmp/pull-secret.txt 파일로 저장한다.
1
{"auths":{"cloud.openshift.com":{"auth":"..SKIP..","email":"[EMAIL_ADDRESS]"},"quay.io":{"auth":"..SKIP..","email":"[EMAIL_ADDRESS]"},"registry.connect.redhat.com":{"auth":"..SKIP..","email":"[EMAIL_ADDRESS]"},"registry.redhat.io":{"auth":"..SKIP..","email":"[EMAIL_ADDRESS]"}}}
mirror-registry 컨테이너 도메인 등록
vi /etc/hosts
hosts 파일에 Quay 레지스트리 도메인에 대한 기존 설정 아래에 추가해준다.
1
2
172.16.0.170 bastion bastion.openshift.ig.local
172.16.0.170 init-quay init-quay.openshift.ig.local
mirror-registry 컨테이너 실행
디렉토리를 생성한다.
mkdir -p /opt/openshift/mirror-registry
지정된 URL에서 네트워크를 통해 미러 레지스트리 설정에 필요한 아카이브 파일을 다운로드한다.
wget https://developers.redhat.com/content-gateway/rest/mirror/pub/openshift-v4/clients/mirror-registry/latest/mirror-registry.tar.gz
다운로드 받은 파일을 지정된 경로에 압축해제 한다.
tar -xvf mirror-registry.tar.gz -C /opt/openshift/mirror-registry
1
2
3
image-archive.tar
execution-environment.tar
mirror-registry
미러 레지스트리에 필요한 설정을 지정하여 설치한다.
cd /opt/openshift/mirror-registry
1
2
3
4
5
./mirror-registry install --initUser [USERNAME] --initPassword [PASSWORD] \
--quayHostname init-quay.openshift.ig.local:8443 \
--quayRoot /opt/openshift/init-quay \
--pgStorage /opt/openshift/init-quay/pg-storage \
--quayStorage /opt/openshift/init-quay/quay-storage -v
설치가 완료되면 다음과 같은 로그가 뜨며 설정한 계정으로 https://init-quay.openshift.ig.local:8443에 접속할 수 있다.
1
2
3
4
5
6
7
8
9
10
11
12
13
14
   __   __
  /  \ /  \     ______   _    _     __   __   __
 / /\ / /\ \   /  __  \ | |  | |   /  \  \ \ / /
/ /  / /  \ \  | |  | | | |  | |  / /\ \  \   /
\ \  \ \  / /  | |__| | | |__| | / ____ \  | |
 \ \/ \ \/ /   \_  ___/  \____/ /_/    \_\ |_|
  \__/ \__/      \ \__
                  \___\ by Red Hat
 Build, Store, and Distribute your Containers

INFO[2024-07-15 15:19:37] Install has begun
..SKIP..
INFO[2024-07-15 15:22:18] Quay installed successfully, config data is stored in /opt/openshift/init-quay
INFO[2024-07-15 15:22:18] Quay is available at https://init-quay.openshift.ig.local:8443 with credentials ([USERNAME], [PASSWORD])
접속하면 로그인 창이 뜬다.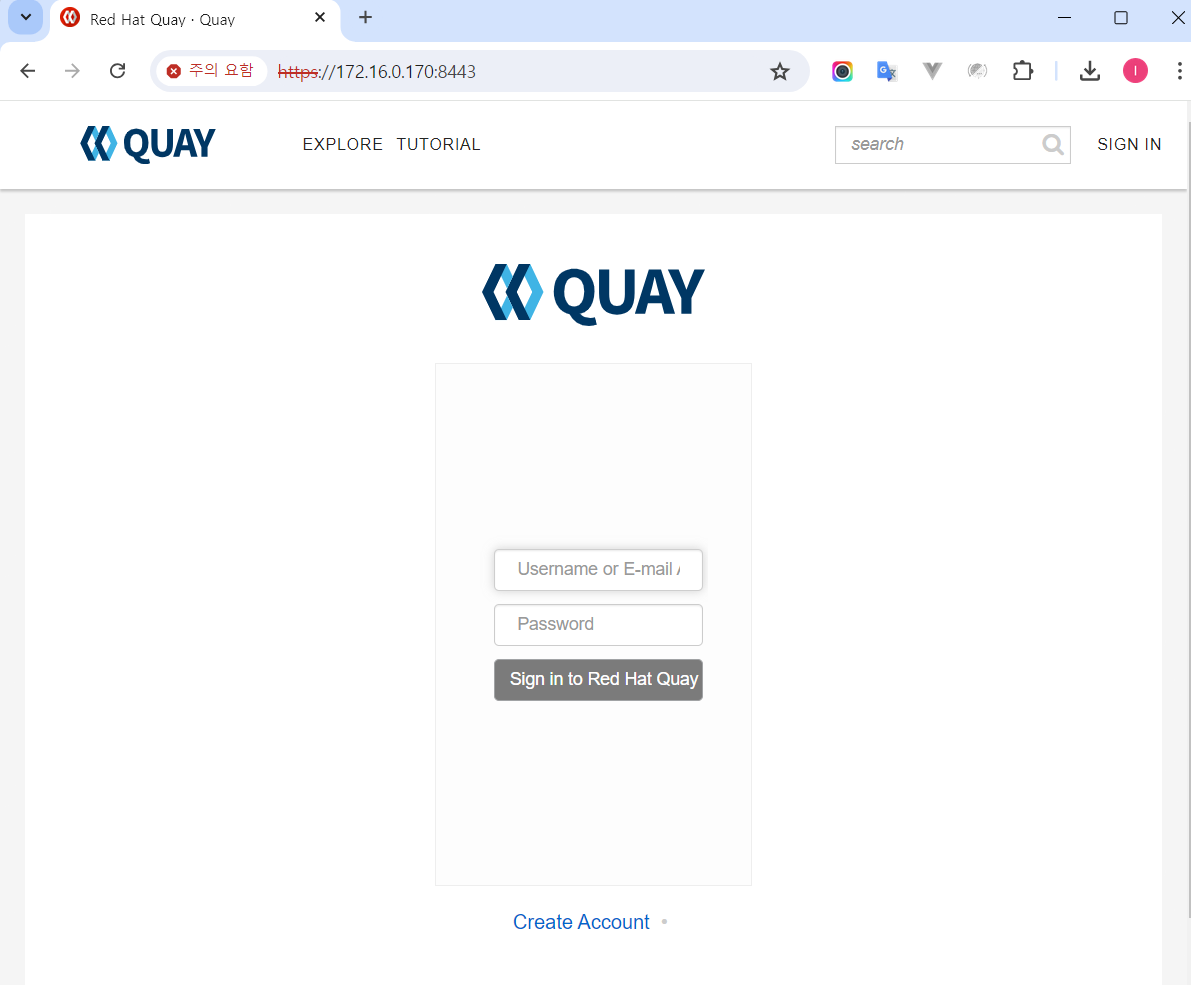
위에서 생성한 username/password로 접속하면 볼 수 있는 화면이다.
컨테이너 상태 및 이미지 리스트 확인
podman ps -a
1
2
3
4
5
CONTAINER ID  IMAGE                                                    COMMAND         CREATED        STATUS        PORTS                   NAMES
c883d9ffac02  registry.access.redhat.com/ubi8/pause:8.7-6              infinity        5 minutes ago  Up 5 minutes  0.0.0.0:8443->8443/tcp  2225e3e700c8-infra
e3019b528ab1  registry.redhat.io/rhel8/postgresql-10:1-203.1669834630  run-postgresql  5 minutes ago  Up 5 minutes  0.0.0.0:8443->8443/tcp  quay-postgres
15ec67af9eac  registry.redhat.io/rhel8/redis-6:1-92.1669834635         run-redis       5 minutes ago  Up 5 minutes  0.0.0.0:8443->8443/tcp  quay-redis
d8407d620550  registry.redhat.io/quay/quay-rhel8:v3.8.15               registry        4 minutes ago  Up 4 minutes  0.0.0.0:8443->8443/tcp  quay-app
podman images
1
2
3
4
5
6
REPOSITORY                              TAG               IMAGE ID      CREATED        SIZE
registry.redhat.io/quay/quay-rhel8      v3.8.15           aec4e0845043  6 minutes ago  907 MB
registry.redhat.io/rhel8/postgresql-10  1-203.1669834630  6ed7d0915fc9  6 minutes ago  428 MB
registry.redhat.io/rhel8/redis-6        1-92.1669834635   e1b3fb240c8c  6 minutes ago  266 MB
registry.access.redhat.com/ubi8/pause   8.7-6             343a8dbc87cd  6 minutes ago  215 MB
quay.io/quay/mirror-registry-ee         latest            0b9664b9f8b2  6 minutes ago  376 MB
실제 화면을 접속하지 않아도 아래 명령어로도 확인 가능하다.
curl -k https://init-quay.openshift.ig.local:8443
1
2
3
4
5
6
<!DOCTYPE html>
<html ng-app="quay" class="onprem">
  <head>
    <base href="/">
  <title ng-bind="title + ' · Quay'">Quay</title>
..SKIP..
인증서 복사
Openshift와 관련된 Root 인증서와 SSL 인증서를 시스템에 추가하고, 이를 갱신하여 해당 인증서를 사용하는 서버와 안전하게 통신할 수 있도록 구성한다.
cp -rf /opt/openshift/init-quay/quay-rootCA/rootCA.pem /etc/pki/ca-trust/source/anchors/cp -rf /opt/openshift/init-quay/quay-config/ssl.cert /etc/pki/ca-trust/source/anchors/update-ca-trust
3. Openshift 관련 패키지 설정
Openshift 클러스터 클라이언트 패키지 설치
oc 패키지를 다운로드하고 /usr/local/bin 경로에 압축 해제하여 환경변수 세팅을 한다.
wget https://mirror.openshift.com/pub/openshift-v4/x86_64/clients/ocp/4.14.15/openshift-client-linux-4.14.15.tar.gztar -zxvf openshift-client-linux-4.14.15.tar.gz -C /usr/local/bin1 2 3
README.md oc kubectl
버전 확인 명령어를 실행하여 잘 설치된 것을 확인할 수 있다.
oc version
1
2
Client Version: 4.14.15
Kustomize Version: v5.0.1
OC 자동완성 활성화
아래 명령어를 통해 자동완성 기능을 활성화하자.
yum -y install bash-completionsource <(oc completion bash)echo "source <(oc completion bash)" >> ~/.bashrc
pull-secret 파일 이동
위에서 저장한 파일 위치를 복사하여 저장한다.
cp /tmp/pull-secret.txt /opt/openshift/pull-secret
jq 유틸리티 설치
JSON 데이터를 처리하고 파싱하는데 jq를 설치한다.
yum -y install jq
파일을 저장할 경로를 생성한다.
mkdir -p /root/.docker
secret 파일을 json 형식으로 복사하여 jq 도구를 이용해 가공한다.
cp /opt/openshift/pull-secret /root/.docker/pull-secret.json
jq '.' /root/.docker/pull-secret.json > /root/.docker/pull-secret.jq
jq 파일을 열어서 quay 레지스트리에 대한 auth, email 총 3줄을 맨 아래 위치에 추가하여 작성한다.
vi /root/.docker/pull-secret.jq
1
2
3
4
5
6
7
    },
      "init-quay.openshift.ig.local:8443": {
      "auth": "XXXXXXXXXXX",
      "email": "[EMAIL_ADDRESS]"
    }
  }
}
사용자 이름과 비밀번호를 Base64 형식으로 인코딩하여 출력하는 명령어이다.
echo -n '[USERNAME]:[PASSWORD]' | base64 -w0
이 방식으로 생성된 문자를 위 auth 란에 입력하면 된다.
수정된 pull-secret 파일 확인
jq '.' -c /root/.docker/pull-secret.jq > /root/.docker/config.json
vi /root/.docker/config.json
oc-mirror plugin 설치
이미지를 로컬 레지스트리에 미러링하기 위한 oc-mirror 플러그인을 설치한다.
mkdir -p /root/openshift/client/ && cd $_wget https://mirror.openshift.com/pub/openshift-v4/x86_64/clients/ocp/stable/oc-mirror.tar.gztar -xvf oc-mirror.tar.gz -C /usr/local/binchmod 755 /usr/local/bin/oc-mirror
oc-mirror version --output=yaml
1
2
3
4
5
6
7
8
9
10
clientVersion:
  buildDate: "2024-07-03T10:18:49Z"
  compiler: gc
  gitCommit: 394b1f814f794f4f01f473212c9a7695726020bf
  gitTreeState: clean
  gitVersion: 4.16.0-202407030803.p0.g394b1f8.assembly.stream.el9-394b1f8
  goVersion: go1.21.11 (Red Hat 1.21.11-1.module+el8.10.0+21986+2112108a) X:strictfipsruntime
  major: ""
  minor: ""
  platform: linux/amd64
OC 미러링 설정 정의
mkdir -p /opt/openshift/mirror-images/ocp4/full
mkdir /opt/openshift/yaml
vi /opt/openshift/yaml/ocp-imageset-config.yaml
1
2
3
4
5
6
7
8
9
10
11
12
13
14
15
16
17
kind: ImageSetConfiguration
apiVersion: mirror.openshift.io/v1alpha2
# archiveSize: 4
storageConfig:
  local:
    path: /opt/openshift/mirror-images/ocp4/full
mirror:
  platform:
    channels:
    - name: stable-4.14
      minVersion: 4.14.15
      maxVersion: 4.14.15
      type: ocp
    graph: true
  additionalImages:
  - name: registry.redhat.io/ubi8/ubi:latest
  helm: {}
oc mirror --config=/opt/openshift/yaml/ocp-imageset-config.yaml file:///opt/openshift/mirror-images/ocp4/full
1
2
3
..SKIP..
info: Mirroring completed in 32m23.62s (10.4MB/s)
Creating archive /opt/openshift/mirror-images/ocp4/full/mirror_seq1_000000.tar
ls -rtlh /opt/openshift/mirror-images/ocp4/full
1
2
3
4
total 19G
drwxr-xr-x. 3 root root  17 Jul 16 11:28 oc-mirror-workspace
-rw-r--r--. 1 root root 19G Jul 16 12:01 mirror_seq1_000000.tar
drwxr-x---. 2 root root  28 Jul 16 12:01 publish
이미지 데이터 불러오기
cd /opt/openshift/mirror-images/ocp4/full/oc-mirror-workspace
oc mirror --from=/opt/openshift/mirror-images/ocp4/full/mirror_seq1_000000.tar docker://init-quay.openshift.ig.local:8443 --dest-skip-tls=true
1
2
3
4
5
6
7
8
info: Planning completed in 340ms
uploading: init-quay.openshift.ig.local:8443/openshift/release sha256:7c5cd780ab203f2123fca402db66695dfd64f90ca0571c3d394dacc5cff51961 23.63KiB
sha256:b43aba1db1e94d4b9d0f006f68963d8d52204319c74b53f11be98a1d0c61bada init-quay.openshift.ig.local:8443/openshift/release:4.14.15-x86_64-deployer
info: Mirroring completed in 520ms (50.79kB/s)
Wrote release signatures to oc-mirror-workspace/results-1721286954
Writing image mapping to oc-mirror-workspace/results-1721286954/mapping.txt
Writing UpdateService manifests to oc-mirror-workspace/results-1721286954
Writing ICSP manifests to oc-mirror-workspace/results-1721286954
ls -rtl /opt/openshift/mirror-images/ocp4/full/oc-mirror-workspace/oc-mirror-workspace/results-1721286954
1
2
3
4
5
6
total 48
drwxr-xr-x. 2 root root     6 Jul 16 13:27 charts
drwxr-xr-x. 2 root root    52 Jul 16 13:34 release-signatures
-rw-r--r--. 1 root root 40240 Jul 16 13:35 mapping.txt
-rwxr-xr-x. 1 root root   351 Jul 16 13:35 updateService.yaml
-rwxr-xr-x. 1 root root   736 Jul 16 13:35 imageContentSourcePolicy.yaml
cat /opt/openshift/mirror-images/ocp4/full/oc-mirror-workspace/oc-mirror-workspace/results-1721286954/imageContentSourcePolicy.yaml
1
2
3
4
5
6
7
8
9
10
11
12
13
14
15
16
17
18
19
20
21
22
23
24
25
26
---
apiVersion: operator.openshift.io/v1alpha1
kind: ImageContentSourcePolicy
metadata:
  name: generic-0
spec:
  repositoryDigestMirrors:
  - mirrors:
    - init-quay.openshift.ig.local:8443/ubi8
    source: registry.access.redhat.com/ubi8
  - mirrors:
    - init-quay.openshift.ig.local:8443/ubi8
    source: registry.redhat.io/ubi8
---
apiVersion: operator.openshift.io/v1alpha1
kind: ImageContentSourcePolicy
metadata:
  name: release-0
spec:
  repositoryDigestMirrors:
  - mirrors:
    - init-quay.openshift.ig.local:8443/openshift/release
    source: quay.io/openshift-release-dev/ocp-v4.0-art-dev
  - mirrors:
    - init-quay.openshift.ig.local:8443/openshift/release-images
    source: quay.io/openshift-release-dev/ocp-release
다음 명령어로도 Quay에 로그인 할 수 있다.
podman login -u [USERNAME] -p [PASSWORD] init-quay.openshift.ig.local:8443
1
Login Succeeded!
Openshift 클러스터 설치 패키지 설치
wget https://mirror.openshift.com/pub/openshift-v4/x86_64/clients/ocp/4.14.15/openshift-install-linux-4.14.15.tar.gz
tar -xvf openshift-install-linux-4.14.15.tar.gz -C /usr/local/bin
1
2
README.md
openshift-install
openshift-install version
1
2
3
4
openshift-install 4.14.15
built from commit 6ee6900a509dfb4a3fd568f741e163655bd3f45c
release image quay.io/openshift-release-dev/ocp-release@sha256:69d1292f64a2b67227c5592c1a7d499c7d00376e498634ff8e1946bc9ccdddfe
release architecture amd64
Comments powered by Disqus.